


 Server
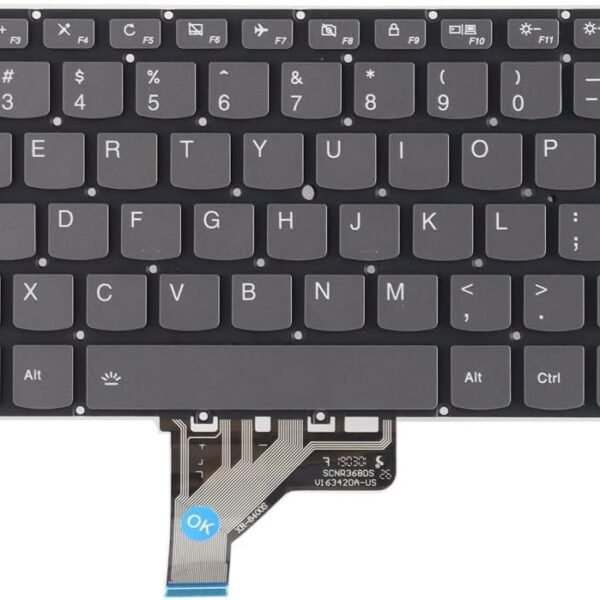

The Lenovo Flex 5‑14 non‑backlit replacement keyboard is an OEM field‑replaceable unit specifically designed for the Flex convertible chassis:
Type: Full‑size chiclet keyboard without backlighting.
Key Travel: Approximately 1.4 mm for comfortable typing.
Connection: Gold‑contact FFC with ZIF interface.
Compatibility: Fits Lenovo Flex 5‑14 series (non‑backlit configuration).
Construction: Spill‑resistant membrane and scissor‑switch keys for long service life.
Replacing your keyboard with this genuine part ensures reliable performance, precise key response, and original Lenovo build quality.
Hurry and get discounts on all Apple devices up to 20%
Sale_coupon_15
KSh3,000.00 excl. VAT
Payment Methods:
At Lansotech Solutions, we specialize in Lenovo Flex 5‑14 keyboard replacement with unmatched attention to detail. Being the top-rated laptop sellers and repair experts in Nairobi, we guarantee every replacement uses genuine Lenovo Field Replaceable Units (FRUs) and follows strict technical procedures to restore your laptop’s original functionality.
The Lenovo Flex 5‑14 series is a convertible 14‑inch laptop known for its slim design. The non‑backlit keyboard version is an integrated unit that requires partial disassembly of the upper case for replacement.
Keyboard Layout: Full‑size chiclet, 6‑row design with multimedia function keys.
Backlight: Non‑backlit (simpler ribbon configuration).
Interface: Flat flexible cable (FFC) with ZIF (Zero Insertion Force) connector to the motherboard.
Mounting: Fixed under the palm rest using screws and plastic retention tabs.
Special Features: Spill‑resistant layers and scissor‑switch mechanism for smooth keystrokes.
To achieve a professional‑grade replacement, use the following:
Precision screwdrivers: Phillips #00, Torx T5.
Plastic prying tools: To open the chassis without scratching.
Tweezers: For FFC cable handling.
ESD wrist strap and mat: For static protection.
Magnetic parts tray: To organize screws.
Genuine Lenovo Flex 5‑14 non‑backlit keyboard FRU (commonly 5N20V07089 or check your specific sub‑model).
Shut down the laptop completely.
Unplug the AC adapter and any peripherals.
Hold the power button for 10 seconds to drain residual power.
Flip the laptop and unscrew all Torx T5 screws.
Use a plastic spudger to gently release the clips around the perimeter.
Lift off the base cover carefully.
Locate the battery connector on the system board.
Disconnect it gently to avoid current flowing during disassembly.
The keyboard is mounted beneath the top case:
Remove the system board securing screws.
Detach the speakers or daughterboards that block access.
Carefully lift or shift components as per Lenovo’s hardware maintenance manual.
Locate all keyboard retention screws (often marked with a keyboard icon).
Remove screws and unclip the tabs securing the keyboard.
Open the lid, tilt the keyboard forward, and disconnect the FFC from the ZIF connector.
Align the new Lenovo Flex 5‑14 keyboard in the top case.
Reconnect the FFC ribbon into the ZIF connector and lock it.
Reinstall all screws and ensure all tabs are secured.
Reinstall the motherboard, speakers, and brackets.
Reconnect the battery.
Replace the bottom cover and secure all screws.
Power on the laptop and run a key matrix test.
Verify all standard and function keys.
Check mechanical alignment for proper key travel and no protruding edges.
We perform:
Firmware diagnostics to ensure keyboard recognition.
Full key scan tests for response and accuracy.
Structural checks to confirm the keyboard sits flush with the palm rest.
Authentic Lenovo replacement parts with warranty.
Certified technicians experienced with the Flex series.
Fast turnaround time, often same day.
After‑service support for other repairs such as hinges, batteries, or screens.
No account yet?
Create an Account


 ASUS
ASUS