


 Server
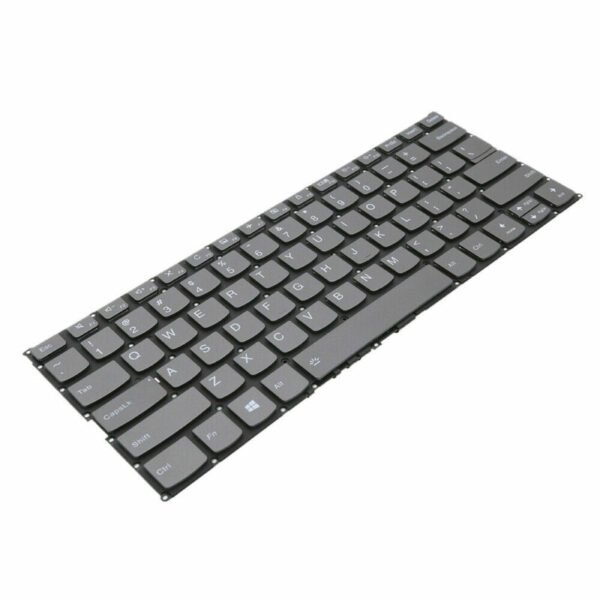

The Lenovo ThinkBook 15 G2 replacement keyboard is an OEM field‑replaceable unit engineered for durability and comfort:
Type: Full‑size chiclet keyboard with integrated numeric keypad.
Key Travel: Approx. 1.4 mm for enhanced tactile feedback.
Connectivity: Gold‑contact FFC with ZIF interface.
Compatibility: Fits Lenovo ThinkBook 15 G2 series (verify FRU for exact model).
Construction: Spill‑resistant membrane layers and precision‑molded keycaps for extended lifespan.
This replacement keyboard restores your laptop’s original typing experience, maintaining the premium build quality expected from the ThinkBook series.
Hurry and get discounts on all Apple devices up to 20%
Sale_coupon_15
KSh2,800.00 excl. VAT
Payment Methods:
At Lansotech Solutions, we provide expert Lenovo ThinkBook 15 G2 keyboard replacement services using genuine Lenovo FRU parts. Our certified technicians in Nairobi perform each repair with precision, ensuring your ThinkBook 15 G2 returns to peak performance. Below is a detailed technical guide describing the replacement process, specifications, and best practices.
The Lenovo ThinkBook 15 G2 series features a full‑size backlit chiclet keyboard integrated into a slim upper chassis.
Key technical details:
Keyboard Layout: 6‑row design with full numeric keypad.
Connection: Flexible flat cable (FFC) with Zero Insertion Force (ZIF) connector to the motherboard.
Mounting: Secured with internal screws and retention clips beneath the palm rest assembly.
Form Factor: Low‑profile key switches, optimized for a thin 15.6″ laptop frame.
For a professional‑grade replacement, the following tools are used:
Precision screwdriver set (Phillips PH0, PH00, and Torx T5).
Plastic pry tools and spudgers to prevent damage to the housing.
ESD wrist strap and antistatic mat for safe handling of electronics.
Tweezers for ribbon cable manipulation.
Original Lenovo ThinkBook 15 G2 keyboard FRU (example FRU: 5N20W77983 – check exact part number for your region).
Magnetic screw organizer to sort screws by size and position.
Power off the laptop and unplug the AC adapter.
Remove all external peripherals and press the power button for 10 seconds to discharge residual electricity.
Unscrew all Torx T5 screws on the underside.
Use a plastic pry tool around the edges to gently release the clips securing the cover.
Locate the main battery connector on the motherboard.
Carefully disconnect it to prevent current from reaching the keyboard circuit.
Remove screws, speakers, and other obstructive components as per Lenovo’s hardware maintenance manual.
Identify the keyboard retention screws, often marked with a small keyboard icon.
Open the lid to a 90‑degree angle.
Use a plastic spudger along the top edge to unclip the keyboard from the chassis.
Gently lift the keyboard and disconnect the FFC from its ZIF connector.
Position the new Lenovo ThinkBook 15 G2 keyboard into the mounting frame.
Reconnect the FFC into the ZIF connector and lock it.
Fasten all retention screws and ensure all clips are properly seated.
Reinstall any removed components (speakers, brackets).
Reconnect the battery and reinstall the bottom cover.
Tighten all screws to Lenovo’s specified torque values.
At Lansotech Solutions, we conduct a series of tests to ensure flawless operation:
Key Matrix Test: Confirm each key’s response through diagnostic software.
Backlight Test: Verify uniform illumination across all keys.
Function Key Test: Ensure hotkeys (volume, brightness, etc.) operate correctly.
Mechanical Fit Check: Confirm the keyboard sits flush with no warping or gaps.
Genuine OEM Lenovo parts sourced through authorized channels.
Certified repair technicians with expertise in the ThinkBook series.
Warranty coverage for both parts and labor.
Fast service turnaround to minimize downtime.
Comprehensive support for related services such as screen, hinge, or battery replacement.
No account yet?
Create an Account


 ASUS
ASUS