


 Server
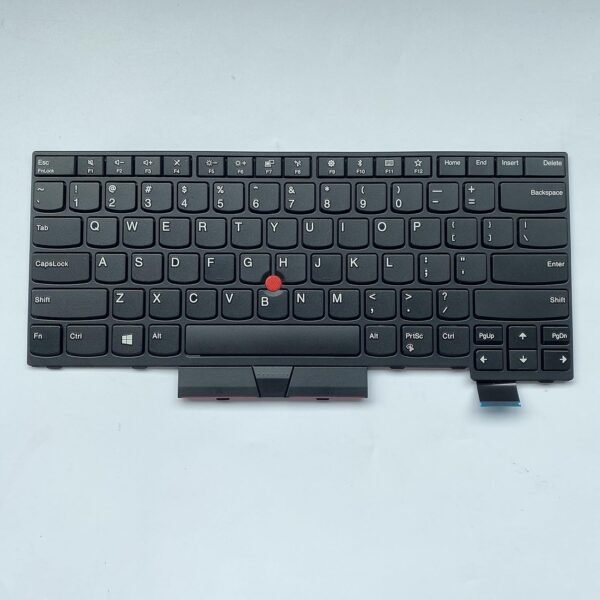
The Lenovo ThinkPad T580 non‑backlit keyboard is a genuine OEM field‑replaceable unit engineered for durability and professional use:
Type: Full‑size 6‑row chiclet keyboard with integrated TrackPoint buttons.
Key Travel: Approximately 1.8 mm for a premium typing feel.
Interface: FPC ribbon with gold contacts and ZIF lock.
Compatible part numbers –: 01YP560, 01YP720, 01YP640, 01YP680, SN20P34095, SN20P34536
Compatible Models -: for Lenovo ThinkPad E580 E585 L580 E590 E595 L590 T590 P52 P72 P53 P53S P73, Laptop Keyboard Compatible for Lenovo Thinkpad E585 E580 E590 E595 T580 L580 L590 FRUs 01YP560 01YP640 01YP720 US Layout Keyboard
Build: Spill‑resistant layers, robust scissor‑switch mechanisms, and Lenovo’s legendary ergonomic design.
Replacing with this genuine part restores original factory performance, tactile response, and long‑term reliability.
Hurry and get discounts on all Apple devices up to 20%
Sale_coupon_15
KSh3,700.00 excl. VAT
Payment Methods:
At Lansotech Solutions, we specialize in Lenovo ThinkPad T580 non‑backlit keyboard replacement with the highest technical standards. As the most trusted laptop sellers and service providers in Nairobi, we handle each repair using genuine Lenovo Field Replaceable Units (FRUs) and follow Lenovo’s official hardware maintenance manuals. Below is a detailed technical guide to help you understand the process.
The Lenovo ThinkPad T580 (20L9, 20LA series) is a 15.6‑inch business‑class laptop.
Its keyboard is a 6‑row classic ThinkPad layout, built for durability and precision.
Keyboard Layout: Spill‑resistant, full‑size, with dedicated numeric row and function keys.
Backlight: Non‑backlit version, uses a simpler FPC cable with no LED power rail.
Connection Interface: Flexible Printed Circuit (FPC) with ZIF (Zero Insertion Force) connector.
Mounting: Secured by screws from the bottom case and retention tabs along the palm rest.
Special Features: Integrated TrackPoint buttons, ergonomic keycap design, 1.8 mm key travel.
To perform a proper keyboard replacement on the T580, you need:
Precision Phillips screwdrivers (#0 and #00)
Torx T6 screwdriver
Plastic pry tools to avoid chassis damage
Tweezers for ribbon cable handling
ESD protection (wrist strap, antistatic mat)
Genuine Lenovo T580 non‑backlit keyboard FRU – common part numbers include 01HX530, 01HX490, or region‑specific equivalents.
Power off the laptop completely.
Remove the AC adapter and all peripherals.
Press and hold the power button for 10 seconds to discharge any residual charge.
Slide the latches and remove the external hot‑swap battery.
Use a Torx T6 screwdriver to remove all screws on the underside of the T580.
Gently pry open the base cover starting from the ventilation edge using a plastic tool.
Locate the internal battery connector and unplug it from the system board to avoid short circuits.
Identify screws marked with a keyboard icon on the underside of the palm rest area.
Remove these screws completely.
Turn the laptop upright and open the display to approximately 90 degrees.
Use a plastic spudger to gently lift the keyboard from the top edge (near the function keys).
Tilt the keyboard forward toward the touchpad area.
Unlock the ZIF connectors carefully with tweezers or your fingernail.
Detach the main keyboard ribbon and TrackPoint cable from the system board.
Align the new OEM Lenovo ThinkPad T580 non‑backlit keyboard in the top case.
Insert both FPC cables into their respective ZIF connectors and lock them securely.
Lower the keyboard into place and ensure all tabs are seated.
Reinstall and tighten all keyboard screws from the underside.
Reconnect the internal battery and reattach the bottom cover.
Reinstall the external battery if applicable.
Power on the device.
Test all alphanumeric and function keys.
Verify TrackPoint and click buttons operate properly.
Our technicians always perform:
Key matrix diagnostic tests to confirm all keys respond accurately.
TrackPoint calibration to verify pointer movement and button response.
Mechanical inspection to ensure proper fit and no uneven keycaps.
Genuine Lenovo spare parts with full warranty.
Certified ThinkPad technicians with years of repair experience.
Fast and reliable service, often same‑day turnaround.
Comprehensive support for additional repairs such as battery, display, or system board issues.
No account yet?
Create an Account

 ASUS
ASUS